


Screen Printing on Wet / Leather-hard Clay Tutorial
Screen Printing on Clay Process by Edie Marie Ceramics
View her step-by-step process full of helpful tips
There are many different techniques for transferring images onto clay. EZScreen provides a low cost and low barrier of entry method to transferring images to clay through screen printing. The following text details the process I have learned and developed for using EZScreen with wet/leather hard clay. You can follow me on Instagram @ediemarieceramics to see more process photos and examples of using EZScreen on clay!
Please note: My process is not the only process for using EZScreen with clay. Far from it! Like with all of ceramics, it is only through experimentation with and application to your specific work that you will discover what works best for you.
Step 1: Preparing the Printing Medium
Slip, engobes, or underglaze can all be used for screen printing. Personally, I like using underglaze because the particles are very fine, pass through the screen easily, and result in a very clean, crisp print. Regardless of the material you choose, the preparation is similar.
1a. Thickening the Underglaze
Straight out of the can, underglaze is the perfect viscosity for painting, but not for printing on wet/leather hard clay. For screen printing the viscosity should be thick and smooth, not watery and runny.
In order to thicken the underglaze, water needs to be evaporated from the underglaze. Transfer the underglaze to a wide mouth container, and let it sit out for several days (the actual length of time depends on the underglaze and your climate). The more surface area exposed to air, the quicker it will dry and thicken. As the underglaze dries out, a thick skin and dried edges will develop.
Underglaze drying in a wide mouth container. A thick skin of underglaze has developed and dried at the edges.
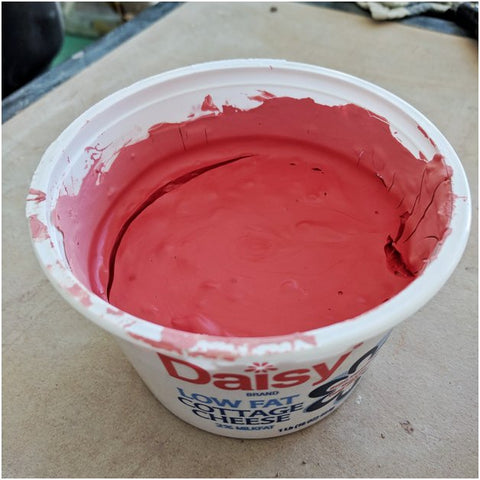
Incorporate the skin and dried edges by stirring the underglaze. Repeat this drying out process until the underglaze is thickened. Just how “thick” is difficult to describe exactly. Some points of reference: 1) It should stay on a spoon/mixer when lifted from the container; and 2) It should also be thicker than the acrylic screen printing medium that is added in the next step. When in doubt, let the underglaze dry out and thicken more than you think it needs to. Adding a little bit of water later is an easy adjustment to make. If you’re mixing slip or engobe to print with, simply make a thicker batch by adding less water.
Thickened underglaze ready for transparent acrylic screen printing medium to be added. Notice that the underglaze is thick enough that it is clumped on the palette knife.
The next step is to add transparent acrylic screen printing medium. SpeedballⓇ has a transparent base that works well for this application. This will burn off in the firing and has no effect on color. Adding the acrylic medium prevents the underglaze from drying too quickly in the screen and adds to the “ink-like” quality you’re looking for. When printing multiple registrations in a row, it is important that the screen not get clogged. If the acrylic medium was not added to the underglaze, it would dry quickly, clog the screen, and require the screen to be washed in-between prints. This is time consuming. You do not want to do this.
For a full 16oz. jar of underglaze, I add about 7 spoonfuls of the acrylic medium. I wish I had an exact ratio to give you, but I don’t. Every underglaze pigment is a little different and requires a different amount. Be wary of adding too much, though! Too much acrylic medium will turn the underglaze into a watery soup and will result in messy registrations. So, go slow, experiment, and add little by little, until you like what you’re working with.
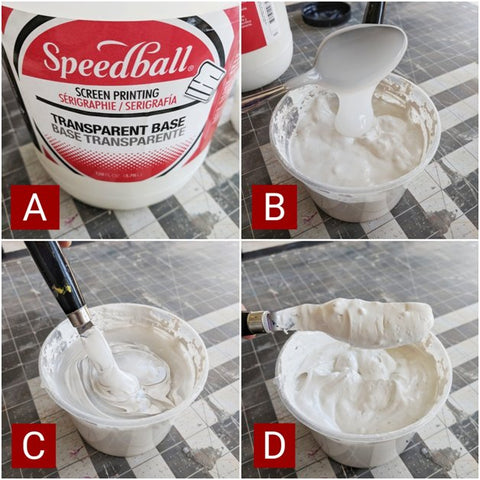
A) SpeedballⓇ transparent screen printing base.
B) Adding the transparent base to the thickened underglaze. Notice the viscosity of the acrylic medium compared to the previous photo of the thickened underglaze. It is smoother and thinner than the thickened underglaze.
C) Mixing the transparent base with the underglaze.
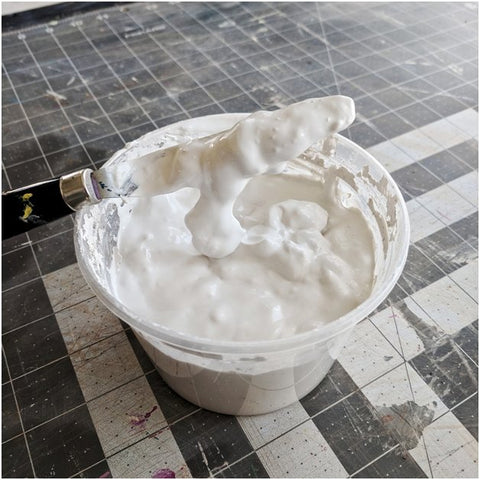
D) Fully incorporated transparent base. The result is a thick, smooth, almost paste-like medium perfect for printing. Also, notice how the underglaze stays on the palette knife compared to before the acrylic medium was added (see the previous photo). The contrast in viscosity will help you determine when you have added enough. Be careful to not add too much acrylic medium! It will make the underglaze too thin which could result in messy registrations.
Step 2: Printing on Wet/Leather Hard Clay
The reason I love using EZScreen is because it allows me to print directly onto clay. Because the screens are unbound by a frame and flexible, they conform to slightly irregular and rounded surfaces. There are limitations, however, to how the screen can bend and still produce a crisp registration when applied directly to clay. And so, printing first onto newsprint and then transfering is always an option. The method you choose is up to you! If printing onto newsprint, I would reference the EZScreen printing instructions for other flat surfaces (like paper or fabric). If you would like to try printing directly onto wet/leather hard clay, the following text includes some tips and tricks.
2a. Soak the Screen
Before printing, the screen needs to be soaked in water. This makes the screen flexible, so that it can wrap around curved surfaces and conform to irregular surfaces. It also gives the screen a bit of “tack” to help keep it in place when printing.
After the screen has soaked and is flexible, remove the screen from the water and place in-between two towels to soak up excess water.
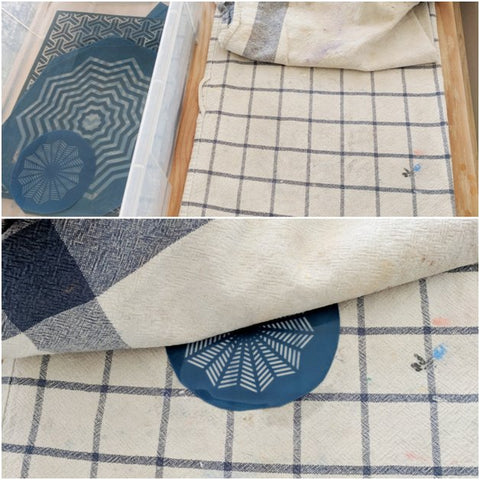
Screens soaking in preparation for use and towels used to dry excess water from the screen before being used.
The towels will do a good job getting most of the water off of the screen, but some water will remain trapped in the screen’s mesh. Printing while this water is still in the screen will result in a messy registration. Anything that makes the underglaze you’ve prepared more watery will tend to make it ooze out from under the screen. Breaking the surface tension of this trapped water with your fingers, blowing on it, or letting it sit out a bit longer to dry are all ways to get this last bit of water out of the screen.
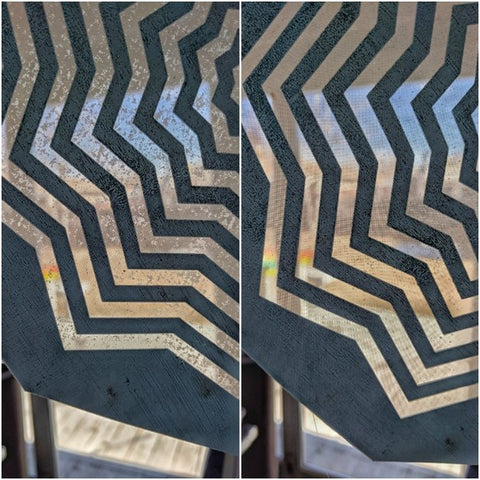
Left: Water still trapped in the mesh of the screen. Right: Water completely removed and ready for printing.
2b. Preparing the Clay
Like the rest of the ceramic process, there is a sweet spot for when it is best to print directly onto clay. When you choose to screen print onto the clay depends, in part, on your desired outcome for the surface of your form. In my experience, you want to print while the clay has a good amount of moisture still in it. When the clay is close to or completely bone dry, it quickly sucks up the moisture in the underglaze you have prepared and will result in a spotty registration and an instantly clogged screen.
2c. Printing Directly onto Wet/Leather Hard Clay
Traditional screen printing involves loading the screen with ink, placing the screen on the printing surface, and then pressing a squeegee down the screen to push the ink through the screen and onto the printing surface. When printing directly onto clay, I have found that a crisp registration requires a similar approach.
After placing the screen on the form where I want it to go, I use a sponge to transfer the underglaze onto the screen. This step loads the screen with underglaze, but it does not adequately distribute the underglaze through the screen and onto the form. To push the underglaze through the screen and onto the form, I prefer to use my finger to rub down the entire printing area. This way I can feel any areas that may need a bit more underglaze, press into an irregular part of the surface, or even print around a curve. If you are printing onto a flat surface, such as a slab before you alter it, you can choose to use a rib like a squeegee to push the underglaze through.
Before taking the screen off the form, I lift an edge to reveal the registration below to make sure it is a clean and crisp registration. More times than not, there will be a spot that needs a bit more underglaze pushed through the screen. To remedy this, I simply lay the screen edge that I have lifted back down and use my finger to push a little more underglaze over that area.
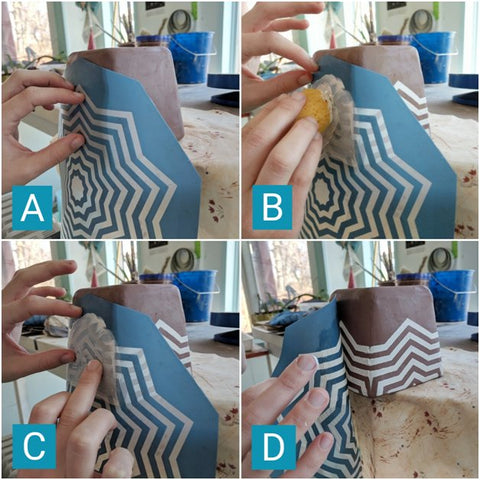
A) Placing the screen on the form where I want the pattern to be transferred.
B) Loading the screen with undergalze using a sponge.
C) Pushing the undergalze through the screen using my finger to capture all the details and conform to the irregular surface and curved edges.
D) Lifting the edge of the screen to reveal the registration to see if any areas need more undergalze pushed through the screen.
Below is a set of screen printed rainbow mugs made by me that were screen printed while leather hard. The EZScreen was wrapped around the curved form, and my finger was used to apply the multiple underglaze colors. The options for using EZScreen on clay are countless. Start experimenting today to develop your own unique technique!
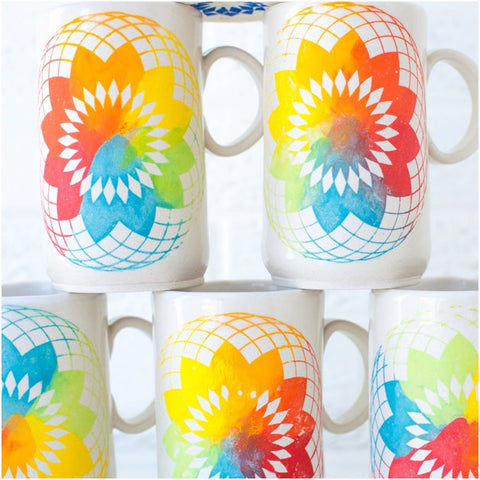
Screen printed rainbow mugs by @ediemarieceramics.
- Choosing a selection results in a full page refresh.