Menu
Printing the Transparency
Introduction
A transparency for screen printing is a clear, transparent sheet or film with a design or image printed on it using an inkjet or Laser printer. It is also frequently referred to as transparent paper. These transparencies are used to transfer the design onto the screen. The design on the screen printing transparency corresponds to the areas on the screen where ink will pass through, allowing the design to be printed onto the desired substrate (e.g., T-shirt, poster, fabric).
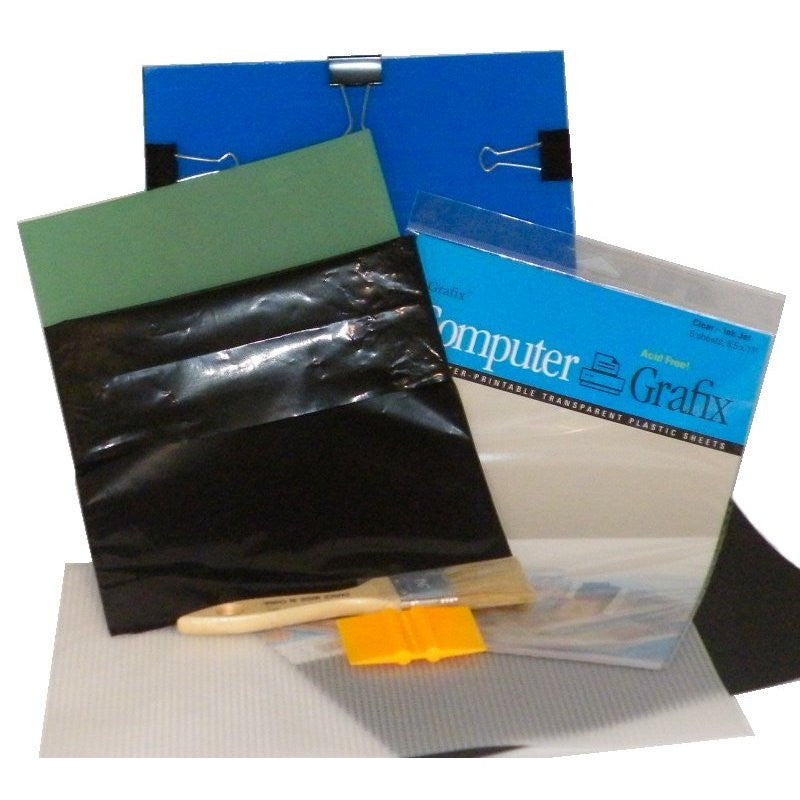
The screen printing transparency (#2 in the photo) takes you from digital artwork(1) to the stencil that can have ink pushed through it.

Supply List
To print a quality transparency for screen printing, you will likely need the following equipment and supplies:- Computer with Design Software: A computer with graphic design software like Adobe Photoshop, Illustrator, CorelDRAW, or Inkscape to create or prepare your design. See software specific instructions below
- Printer: A printer capable of producing high-quality prints. Make sure it's in good working condition and has an option for manual feed.
- Screen printing transparency: Transparent paper or film designed specifically for your printer type (inkjet or laser). It's crucial to use the right type of transparency paper for screen printing to ensure that the ink passes through the stencil well and produces a sharp image.
- Design or Artwork: Your screen printing design or artwork prepared and finalized in the desired size and format.
- Printer Settings: Configure your printer settings to the highest quality print mode. You may need to adjust settings like print resolution and paper type to achieve optimal results.
- Drying Rack or Area: A clean and dust-free area where you can place your printed transparencies to dry. Avoid stacking them, as wet ink can smudge easily.
- Gloves (optional): Disposable gloves to handle the transparency film and printed sheets, preventing fingerprints and smudges.
- Test Prints: Extra print transparencies for test prints. It's a good practice to run a test print to ensure the colors and design are accurate before printing the final transparency.

Choosing a Design
When creating a design for printing on transparent paper, there are several important considerations that artists should keep in mind to ensure the design works well for the screen printing process. Here's what artists should look for in a design:
-
Simplicity and Clarity:
- Screen printing works best with clean, simple designs. Avoid intricate details that may be challenging to pass from the print transparency to the stencil accurately.
- Use fonts that are legible and suitable for screen printing.
- Pay attention to the thickness of lines and details in your design. Very thin lines may not hold up well in screen printing and can be prone to filling in during printing
-
High Contrast:
- Designs with clear contrast between the foreground and background elements tend to work well. High contrast makes it easier to create sharp, well-defined stencils.
- Avoid black and white photographs. Having a design with pure black elements and a transparent or pure white background is just not the same as having a black and white photograph.
-
Vector Graphics (optional):
- Whenever possible, use vector graphics or create designs in vector-based software. Vector designs are scalable without loss of quality and can be easily converted into stencils.
-
Image size:
- If not using vector artwork (most common), be sure to use the highest resolution artwork possible. Set dpi to 300 and make sure you are using sufficiently large artwork. Often times images you find on the web may be highly compressed and a lower resolution to optimize page load speeds.
I don't have design skills...
Where can I find designs that will work well for printing on a transparency for silk screen printing?
-
Stock Image Websites:
- Websites like Shutterstock, Adobe Stock, Getty Images, and iStock offer a wide range of high-quality stock images and vector illustrations. You can search for designs that already have high contrast and are suitable for your screen printing project. Keep in mind that you may need to purchase a license for these images.
-
Graphic Design Marketplaces:
- Platforms like Creative Market and GraphicRiver provide access to a variety of design assets, including high-contrast illustrations, graphics, and templates. These assets can be purchased and customized to meet your specific needs.
-
Free Design Resources:
- Websites like Freepik, Pixabay, and Unsplash offer free design resources, including high-contrast images and vector graphics. Be sure to check the licensing terms for each resource to ensure they can be used for your purposes.
-
Design Software Libraries:
- Many graphic design software applications, such as Adobe Illustrator and CorelDRAW, come with libraries of pre-designed vector shapes and elements. Explore these libraries to find high-contrast design elements that can be incorporated into your own compositions.
-
Online Design Communities:
- Online design communities and forums, like Dribbble and Behance, feature work from talented designers. You can find inspiration and contact designers directly to inquire about licensing or customization options.
-
Custom Design Services:
- If you have a specific vision for your project but lack the design skills, consider hiring a professional graphic designer. They can create a custom high-contrast design tailored to your needs.
-
Friends and family:
- Odds are pretty good you know someone who is a bit of an artist and would enjoy putting together some high contrast artwork with you.

Preparing your design
-
Sizing:
- You can size your artwork in the print dialog box by entering a percentage to increase or decrease the size of your artwork on the page, however, if you are using design software you can be more precise and compose multiple elements together.
- Pay attention to the space around outside of your artwork. We recommend a .5 inch border on all sides. The border is the space you will have to place tape to secure your EZScreen to your print substrate.
- Often times images you find on the web are compressed and don't do well for printing. Images on the web are optimized to allow high page load speeds. Not for printing. Avoid scaling artwork up to the point you see a jagged edge or pixelation. The jagged edge will come through in your print on transparent paper, and thus onto the stencil.
-
Colors:
- Every elment that is meant to be printed with ink in the final stencil should be pure black. The color codes for the richest black in RGB is 0,0,0. In CMYK it is C=60, M=40, Y=40, K=100.
- Check to verify that nothing will be printed for the background. RGB (255,255,255), Hex #ffffff, or tansparent.
-
Color Separations (if needed):
- For multicolor designs, create separate layers or objects for each color in your design. This makes it possible to print transparencies for each color.
-
Halftones (advanced):
- Be mindful of how you handle halftone effects. Users have had success with EZScreen sheets doing a halftone design, but they may require more attention and specific settings.
The author has been informed that as a general guideline, for EZScreens, you can start with a halftone dot size of around 45-55 lines per inch (LPI) for halftone dots. This means there will be 45-55 dots per linear inch in your halftone pattern. This has NOT been rigorously tested.
However, it's important to note that there is no one-size-fits-all answer for halftone dot size. You may need to experiment with different dot sizes and settings to achieve the desired results for your specific design and printing conditions. Factors like the type of substrate, ink type, and printer settings can all influence the final dot size and appearance.
It's a good practice to create test prints with various halftone dot sizes to determine which one works best for your particular screen printing project. This allows you to fine-tune the settings and achieve the desired level of detail and quality in your prints.
- Be mindful of how you handle halftone effects. Users have had success with EZScreen sheets doing a halftone design, but they may require more attention and specific settings.
-
Registration Marks (if needed):
- If you're creating transparencies for multiple colors, add registration marks to help with accurate alignment during the screen printing process.
-
Text and Fonts:
- Convert text to outlines or paths to avoid font-related issues when printing on transparent paper.

Printing a transparency for silk screen printing requires specific printer settings to ensure accurate reproduction of your design. These settings may vary slightly depending on your printer model and software, but here are general guidelines to follow:
-
Paper Type Setting:
- In your printer settings, select the appropriate paper type. Usually, "Transparency" or "High-Quality Inkjet Transparency" is the best choice. If a setting specific to transparencies is available, use that setting. Otherwise, you may need to test paper settings. "Specialty Paper", "gloss", or "Photo paper" are typically good places to start.
-
Print Quality:
- Set the print quality to the highest resolution available (usually "Best" or "High Quality"). Higher resolution ensures sharp and accurate prints.
-
Scaling:
- Disable any scaling or resizing options in the printer settings. Or ensure that your design is set to print at expected size and placement.
-
Mirror Printing (Optional):
- When printing on fabric using EZScreen(s) it is typically not necessary to revers or mirror your image.
- If your design requires reverse printing (e.g., when using a transfer medium such as rice paper or a gel plate), enable the mirror or flip horizontally option in the printer settings.
-
Ink Density Adjustment:
- Some printers allow you to adjust ink density or saturation. Experiment with these settings to achieve the desired level of ink coverage without over-inking, which can cause smudging on the transparency.
-
Print Preview:
- Always preview your print before sending it to the printer to ensure that the design is correctly positioned on the transparency.
-
Transparency Handling:
- Transparency paper/film will often have a smooth glossy side, and a rough/textured side. Make sure when you load the screen printing transparency into your printer, it will be printed on the rough side. The smooth side of the transparency will prevent the printer ink from drying and will smear. Tip: If it's hard to tell which side of the transparency is the printable side, lightly dab a corner of the transparency with moisture. The printable coated side will feel tacky.
- Remove any printer paper if necessary.
-
Drying Time:
- Allow the printed transparency to dry completely before handling it. Drying time can vary depending on the ink and film/paper type, so consult the manufacturer's recommendations.
-
Printer Profile (Optional):
- You can use custom printer profiles or color management settings if you have them, which can help achieve color accuracy.
- When you find settings that work, save those settigns as a preset in the print dialog box. You will be so happy you did the next time you print.
-
Test Prints:
- Before you print on transparent paper, consider making a test print on regular paper to check for any issues with color accuracy, alignment, or sizing.
Software
We get a lot of questions about software. In truth, it is probably technically possible to find a design and print on your transparent paer/film straight from your phone using the printer dialog to size and scale your artwork. However, the design and file preparation process is rarely that simple. Here are some of the more common software packages that can help you prepare a file for printing printing on transparent paper/film.
- Adobe Photoshop: Photoshop is a powerful raster-based image editing software. It's excellent for working with photos, digital artwork, and complex designs. You can create and manipulate images, add text, and adjust colors as needed.
- Adobe Illustrator: Illustrator is a vector-based design software, making it ideal for creating clean, scalable designs and vector graphics. This is particularly useful for logos, typography, and other graphics that need to maintain their quality at different sizes.
- CorelDRAW: CorelDRAW is another vector-based design software that's suitable for creating vector graphics, illustrations, and designs. It's a good alternative to Adobe Illustrator.
- Inkscape: Inkscape is a free, open-source vector graphics editor that's similar to Adobe Illustrator. It's a great option for those looking for a free alternative.
- GIMP (GNU Image Manipulation Program): GIMP is a free, open-source raster-based image editor that's comparable to Adobe Photoshop. It's suitable for creating and editing images and designs.
- Canva: Canva is an online graphic design tool that offers a user-friendly interface and templates for various design projects, including screen printing designs. It's a good option for beginners.
- Affinity Designer: Affinity Designer is an affordable vector-based design software that offers many of the features found in Adobe Illustrator.
Adobe Photoshop
Preparing artwork in Adobe Photoshop for printing as a silk screen transparency involves several steps to ensure that the design is accurate, high-resolution, and suitable for the screen printing process. Here's a guide on how to prepare artwork for silk screen printing using Adobe Photoshop:
-
Design Sizing and Resolution:
- Open your design in Adobe Photoshop.
- Set the document dimensions to match the size you want to print on your transparency.
- Ensure the resolution is at least 300 DPI (dots per inch) to ensure a high-quality print.
-
Color Mode:
- Change the color mode to CMYK if your design is intended for color printing, or Grayscale if it's a black and white design. CMYK is suitable for full-color designs, while Grayscale is ideal for single-color or halftone designs.
-
Design Adjustment:
- Adjust and refine your design as needed. This may include cleaning up imperfections, resizing elements, or enhancing contrast to make the design stand out.
-
Ink Density:
- Ensure that design elements are pure black to produce sharp and clear prints. Adjust the ink levels as necessary. Black should always be pure black rgb(0, 0, 0) or hex #000000.
- you can use the "Threshold" adjustment tool to ensure that a design or image is 100% black and has no shades of gray or other colors. Here is how:
-
Duplicate the Layer (Optional):
- It's a good practice to duplicate the layer containing your design before applying adjustments, so you can compare the original with the adjusted version if needed. To do this, right-click on the layer in the Layers panel and select "Duplicate Layer."
-
Threshold Adjustment:
- With the duplicated layer selected, go to the "Image" menu.
- Choose "Adjustments," and then select "Threshold."
-
Adjust the Threshold Slider:
- A dialog box will appear with a slider. Move the slider to the right to increase the threshold. As you do this, you'll notice that the image will turn progressively black and white.
- Continue moving the slider until the entire design becomes 100% black without any shades of gray. You want to achieve a clean, high-contrast image with sharp edges.
-
Apply the Threshold:
- Once you're satisfied with the threshold adjustment, click "OK" to apply the changes.
-
-
Separate Colors (if needed):
- For multicolor designs, create separate layers for each color component of the design. You can use layer masks to isolate each color.
-
Halftone Dots (if needed):
- If you need to create shades or gradients, use Photoshop's halftone filter to convert continuous tones into dots.
-
Text and Fonts:
- It is always good to remember to convert all text layers to rasterized layers to prevent font issues during printing.
-
Transparency Background:
- Create a transparent background for your design. Remove any unnecessary background elements.
-
Save File:
- Save your artwork in a high-resolution format suitable for printing, such as TIFF or PNG. Choose a format that supports transparency and maintains the highest image quality.
-
Check for Errors:
- Zoom in and thoroughly inspect your design for any errors, artifacts, or unintended details. Correct any issues.
-
Print a Test Copy:
- Before printing on the transparency, print a test copy on regular paper to ensure that colors, sizing, and design details are accurate.
-
Print on Transparency:
- Load transparency film into your inkjet printer.
- Adjust printer settings to the highest quality print mode.
- Print your design on the transparency.
-
Dry the Transparency:
- Allow the printed transparency to dry completely before handling it to prevent smudging.
-
Inspect for Quality:
- Examine the printed transparency for any imperfections. Ensure that it accurately represents your intended design.
Adobe Illustrator
Preparing artwork in Adobe Illustrator for printing as a silk screen transparency involves specific steps to ensure that the design is suitable for screen printing, maintains its quality, and facilitates the screen exposure process. Here's a guide on how to prepare artwork for silk screen printing using Adobe Illustrator:
-
Document Setup:
- Open your design in Adobe Illustrator.
- Set up your document with the correct dimensions, matching the size you want to print on your transparency.
-
Color Mode:
- Choose the appropriate color mode based on your design:
- For full-color designs, use CMYK.
- For single-color or black-and-white designs, use Grayscale.
- Choose the appropriate color mode based on your design:
-
Design Adjustment:
- Refine your design as needed, making sure it's clean and free of imperfections.
- Verify that your design elements are accurately sized and properly positioned.
-
Ensure all elements are pure black
- Select each element in your design and verify that they have a fill color that is black. Black should always be pure black rgb(0, 0, 0) or hex #000000.
-
Color Separations (if needed):
- For multicolor designs, create separate layers or objects for each color in your design. This makes it easier to create individual transparencies for each color.
-
Halftone Dots (if needed):
- If your design requires shades or gradients, use Illustrator's halftone settings to create halftone dots.
-
Text and Fonts:
- Convert all text to outlines to avoid font-related issues during printing.
-
Transparency Background:
- Ensure that the background of your design is transparent, eliminating any unnecessary elements.
-
Save File:
- Save your artwork in a suitable format for printing, such as AI (Illustrator), EPS, PDF, or TIFF. Maintain the highest image quality and ensure that transparency is preserved.
-
Check for Errors:
- Zoom in and inspect your design for any errors, artifacts, or unintended details. Correct any issues.
-
Print a Test Copy:
- Before printing on the transparency, print a test copy on regular paper to check for color accuracy, sizing, and design details.
-
Print on Transparency:
- Load transparency film into your printer.
- Adjust printer settings for the highest quality print mode.
- Print your design on the transparency.
-
Dry the Transparency:
- Allow the printed transparency to dry completely before handling it to avoid smudging.
-
Inspect for Quality:
- Examine the printed transparency for any imperfections and verify that it accurately represents your intended design.
CorelDRAW
To prepare artwork in CorelDRAW for printing as a silk screen transparency, follow these steps:
-
Open Your Design:
- Launch CorelDRAW and open the design or artwork you want to prepare for silk screen printing.
-
Document Setup:
- Set up your document with the correct dimensions, matching the size you intend to print on your transparency. Go to "File" > "New" to create a new document or adjust the document properties if necessary.
-
Color Mode:
- Ensure your design is in the appropriate color mode:
- For full-color designs, use CMYK mode.
- For single-color or grayscale designs, use Grayscale mode.
- Ensure your design is in the appropriate color mode:
-
Design Adjustment:
- Refine your design as needed, cleaning up any imperfections and ensuring that it's correctly sized and positioned.
-
Color Separations (if needed):
- For multicolor designs, create separate layers or objects for each color component of the design. You can do this by using the Layers panel.
-
Halftone Dots (if needed):
- If your design requires shades or gradients, you can use CorelDRAW's halftone tools to create halftone dots.
-
Text and Fonts:
- Convert all text to curves to avoid font-related issues during printing. Select the text, go to "Arrange" > "Convert to Curves."
-
Transparency Background:
- Ensure that the background of your design is transparent, removing any unnecessary elements.
-
Registration Marks (if needed):
- If your design involves multiple colors, consider adding registration marks to assist with accurate alignment during the screen printing process.
-
Save File:
- Save your artwork in a suitable format for printing, such as CorelDRAW (CDR), PDF, TIFF, or PNG. Maintain the highest image quality and ensure that transparency is preserved if needed.
-
Check for Errors:
- Zoom in and carefully inspect your design for any errors, artifacts, or unintended details. Correct any issues.
-
Print a Test Copy:
- Before printing on the transparency, print a test copy on regular paper to check for color accuracy, sizing, and design details.
GIMP
To prepare artwork in GIMP for printing as a silk screen transparency, follow these steps:
-
Open Your Design:
- Launch GIMP and open the design or artwork you want to prepare for silk screen printing.
-
Document Setup:
- Set up your canvas size to match the dimensions you intend to print on your transparency. Go to "Image" > "Canvas Size" to adjust it if necessary.
-
Color Mode:
- Ensure your design is in the appropriate color mode:
- For full-color designs, use RGB mode.
- For single-color or grayscale designs, use Grayscale mode.
- Ensure your design is in the appropriate color mode:
-
Design Adjustment:
- Refine your design as needed, cleaning up any imperfections and ensuring that it's correctly sized and positioned.
-
Color Separations (if needed):
- For multicolor designs, create separate layers for each color component of the design. You can do this by using the Layers panel.
-
Halftone Dots (if needed):
- If your design requires shades or gradients, you can create halftone dots using the "Filters" menu. Navigate to "Filters" > "Distorts" > "Newsprint."
-
Text and Fonts:
- Convert all text layers to rasterized layers to avoid font-related issues during printing. Right-click on the text layer and select "Layer" > "To Image."
-
Transparency Background:
- Ensure that the background of your design is transparent, removing any unnecessary elements.
-
Registration Marks (if needed):
- If your design involves multiple colors, consider adding registration marks to assist with accurate alignment during the screen printing process.
-
Save File:
- Save your artwork in a suitable format for printing, such as TIFF, PNG, or PSD. Maintain the highest image quality and ensure that transparency is preserved if needed.
-
Check for Errors:
- Zoom in and carefully inspect your design for any errors, artifacts, or unintended details. Correct any issues.
-
Print a Test Copy:
- Before printing on the transparency, print a test copy on regular paper to check for color accuracy, sizing, and design details.
Canva
Canva is a user-friendly online graphic design tool that can be used to create artwork for various purposes, including silk screen transparencies. Here's how to prepare artwork in Canva for printing as a silk screen transparency:
-
Open Canva:
- Go to the Canva website and log in to your account or sign up for one if you don't have an account.
-
Create a New Design:
- Click on "Create a design" or select a custom dimensions option to set up your canvas size to match the dimensions you intend to print on your transparency.
-
Choose a Color Mode:
- Canva primarily works in RGB color mode, which is suitable for digital designs. If your silk screen design is single-color or grayscale, you can work in RGB mode but ensure that your design is entirely in shades of gray or the single color you intend to use.
-
Design Your Artwork:
- Use Canva's tools and features to design your artwork. You can add text, shapes, images, and customize elements as needed.
-
Transparency Background:
- Make sure the background of your design is transparent. To do this, remove any background color or elements that you don't want to appear on the transparency.
-
Color Adjustment (if needed):
- If you're creating a single-color design, ensure that all elements are in the correct color. You can use Canva's color picker to select the desired color.
-
Text and Fonts:
- If you're using text in your design, choose fonts that are suitable for silk screen printing. You may want to convert text to shapes or outlines if necessary.
-
Save Your Design:
- Once your design is complete, click on the "Download" button and select a suitable format for printing, such as PNG or PDF. Make sure to choose a format that supports transparency.
-
Check for Errors:
- Zoom in and inspect your design for any errors, artifacts, or unintended details. Correct any issues.
-
Print a Test Copy (if possible):
- If you have the capability, print a test copy of your design on regular paper to check for color accuracy, sizing, and design details.
Affinity Designer
To prepare artwork in Affinity Designer for printing as a silk screen transparency, follow these steps:
-
Open Your Design:
- Launch Affinity Designer and open the design or artwork you want to prepare for silk screen printing.
-
Document Setup:
- Set up your document with the correct dimensions, matching the size you intend to print on your transparency. Go to "File" > "Document Setup" to adjust it if necessary.
-
Color Mode:
- Ensure your design is in the appropriate color mode:
- For full-color designs, use RGB mode.
- For single-color or grayscale designs, use Grayscale mode.
- Ensure your design is in the appropriate color mode:
-
Design Adjustment:
- Refine your design as needed, cleaning up any imperfections and ensuring that it's correctly sized and positioned.
-
Color Separations (if needed):
- For multicolor designs, create separate layers or objects for each color component of the design. You can do this by using the Layers panel.
-
Halftone Dots (if needed):
- If your design requires shades or gradients, you can create halftone dots using Affinity Designer's halftone tools.
-
Text and Fonts:
- Convert all text layers to curves to avoid font-related issues during printing. Select the text, go to "Layer" > "Convert to Curves."
-
Transparency Background:
- Ensure that the background of your design is transparent, removing any unnecessary elements.
-
Registration Marks (if needed):
- If your design involves multiple colors, consider adding registration marks to assist with accurate alignment during the screen printing process.
-
Save File:
- Save your artwork in a suitable format for printing, such as TIFF, PNG, or PDF. Maintain the highest image quality and ensure that transparency is preserved if needed.
-
Check for Errors:
- Zoom in and carefully inspect your design for any errors, artifacts, or unintended details. Correct any issues.
-
Print a Test Copy:
- Before printing on the transparency, print a test copy on regular paper to check for color accuracy, sizing, and design details.
- Choosing a selection results in a full page refresh.

